Death by SharePoint –
10 ways to increase engagement.
Best Practice
Author: Julia Borkenhagen, CXO and Co-founder at Whitespace
Date: 29 March 2016
SharePoint is a powerful tool for organizing, storing, and sharing information, but it can be complex to use, especially for users who are not familiar with it.
For this reason, it is important to involve the users from the outset of any SharePoint implementation project.
In this article, I present a number of ways to make the use and adoption of SharePoint less onerous.
Is SharePoint usability an oxymoron?
SharePoint is a powerful business solution, but from the perspective of the average business user, it is not for the faint of heart. Some of the reasons that using SharePoint may not be easy include:
- There is a learning curve: SharePoint has many features and capabilities, and it can take time to learn how to use them effectively.
- It requires a solid understanding of how to organize information: To get the most out of SharePoint, you need to understand how to structure and categorize your information so that it is easy to find and access.
- It requires careful planning: Setting up a SharePoint site requires careful planning and consideration of the needs and goals of the users.
- It requires regular maintenance: SharePoint sites require regular maintenance to ensure that they remain organized and up-to-date.
- It can be confusing: SharePoint has a lot of features and options, which can be confusing for some users.
Overall, while SharePoint can be a powerful tool for organizations, it does require a certain level of knowledge and effort to use effectively. UX professionals can help to smooth out the bumps in the road and make the adoption of SharePoint easier for business users.
What’s the point of SharePoint?
If asked, most kindergarteners would say it’s about sharing. Of course it’s also about collaboration and communication, but sharing stuff is where SharePoint really shines.
This was just what a recent intranet project of ours was about: sharing team information that is buried in a labyrinth of local and network drives using out-of-the-box SharePoint 2013. Sounds simple enough, right?
Well, nothing is as simple as it first appears, especially not with SharePoint. Adding to the challenge, our mission as user experience (UX) consultants was to make it really “easy to use” without resorting to 3rd-party plugins or customization in SharePoint Designer.
While making SharePoint easy to use may sound like a contradiction in itself, and while I would have loved to customize a few things along the way, I believe that it is possible to achieve this goal if you keep focusing on one thing: user adoption.
Many collaboration sites fail because business users are presented with a default SharePoint team site that is neither configured to their needs nor reveals many of the useful features SharePoint has to offer. You cannot expect a regular business user to become a SharePoint expert and designer overnight, and he or she shouldn’t. While it is terribly easy for IT departments to set up team sites and let users muddle through, that kind of practice is not helpful and can end in a very chaotic environment with many dead ends.
So it’s all about user adoption. What helps?
It’s all fine and good to have well designed corporate and departmental intranet pages. But team sites and cross-functional project sites are where the action is. Based on our experience, here are 10 recommendations for driving adoption of SharePoint at the team level.
1. Give a demo, show a proof of concept
I would do this as early on as possible. The demo does not have to be adapted exactly to the team’s needs, but should demonstrate some of the key features SharePoint has to offer: how to preview, open, edit and save a document; simple workflows; faceted search; as well as library and list views based on metadata. Later on during the workshop phase, a lot will revolve around metadata, and it is very hard to convince users of the value of tagging content unless you give them a concrete example.
Using PowerPoint will not do the trick, as I can attest from personal experience! The proof of concept should come right after the workshops (see below) and really bring the ball home. It can be created on just one library of the overall site or sites, but it should use a sufficient amount of documents to make the experience “real”.
2. Workshops, workshops, workshops
Gather the team and work together on a content strategy and information architecture that makes sense. To help get the creative juices flowing, be sure to have sticky notes, lots of wall space, coffee, and chocolate on hand.

You need to answer questions such as:
- What is the purpose of the new team site? “Simple” document collaboration, sharing, and publishing? Or should other collaboration tools such as assigning tasks, sharing calendars, tracking issues, etc. be used? Are advanced Business Intelligence features required? It’s important here not to use a feature just because it’s there.
- What information and documents should actually be located on SharePoint? All files, only final versions, only documents to be shared with other teams? Depending on the inclination of the users to share, not all documents are candidates for SharePoint and the definition of what goes where has to be made clear – otherwise, the situation may become even messier than before.
- How to group and organize the content? What kind of document types / deliverables do users produce? How could this content be classified and tagged using metadata?
- What workflows are required, and are there relationships between different documents or libraries? One recurring need in a recent project we led was to display finalized documents in different locations ¬ in our case this involved the authoring team’s project space, another department’s team site, and an external resource center.
- What access rights are needed? First of all, ask yourself are they really needed at all? SharePoint has a rather fine-grained system for assigning permissions, and it also makes it very easy for end users to give access to documents by simply sharing them. The downside is that permissions in SharePoint are difficult to manage once they have been granted, especially if the permissions get granular. Therefore, the simpler, the better. Trying to stay at the list or document library level is usually a good idea – document-level permissions can get hairy.
These needs will influence the overall site architecture.
3. Make navigation as easy as possible and increase findability with managed metadata
In my opinion, one of SharePoint’s greatest weaknesses is its navigation and the many possible ways of getting it wrong. Since the philosophy of SharePoint is to create site collections with n numbers of nested sites underneath, the danger of losing the user is great if the sites are not set up with care.
The principles are straightforward but often overlooked: if you have a collection of sites, make sure they are held together by an overall navigation (horizontal top nav). Within each site, show the different libraries, lists or pages on the left-hand side (you can also group them if needed). And get rid of the default links if you don’t use them. I know that sounds obvious, but I have seen many empty “Notebooks”!
One link I would definitely take out is the one called “Recent” – not useful in my opinion and confusing. SharePoint has a tendency to add it back each time you create a new library, so remove it when you are finished with setting everything up!
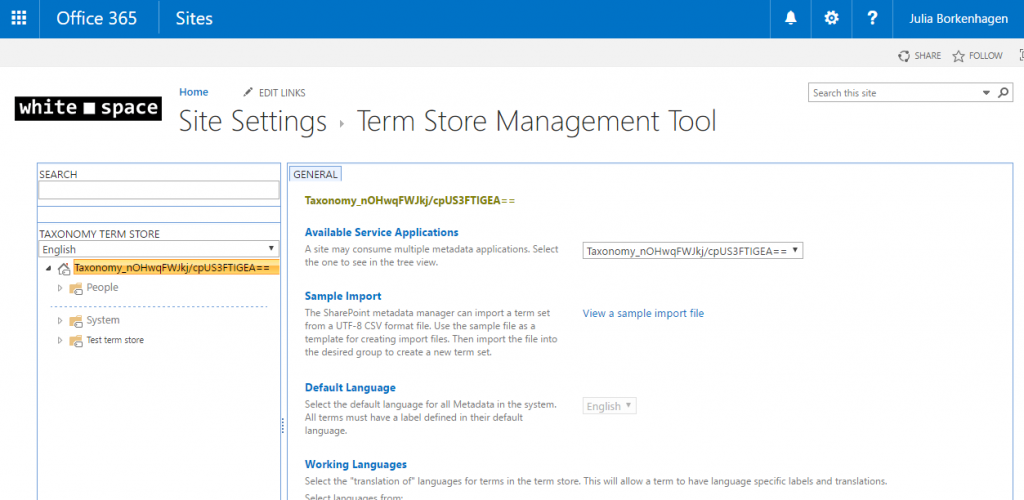
Consistently tagging information with metadata will also enhance findability, not only at the team site level but also company-wide using the global search. In order for this to work, it is helpful to define a corporate taxonomy in the so-called Term Store. Term sets created here can be open or closed, depending on whether users should be allowed to contribute to the classification system or not. SharePoint allows distributed ownership of these term sets, which can considerably lighten the burden of managing all the data. The search results should then be configured to display the main company categories and allow the users to easily narrow down the results via faceted navigation.
4. Make it as pretty as possible
Remember that we’re dealing with vanilla SharePoint here. Except for the content web part, you cannot change the font size (too small), the spacing (sometimes random), or format the table layout. Mind you, SharePoint provides you an option to choose different layouts, such as striped rows, which can be very nice since the default table lacks any kind of row or column formatting. But when you choose any option other than the default one, rather important features such as the search box in the toolbar or the quick edit function go missing.
SO – back to the task of making it “pretty”. The best friend you have is the content web part, which allows you to increase your text size and add graphics, tables, etc. It may sound “old school”, but a nice banner at the top of the page goes a long way in user adoption, or at least in getting some positive feedback!
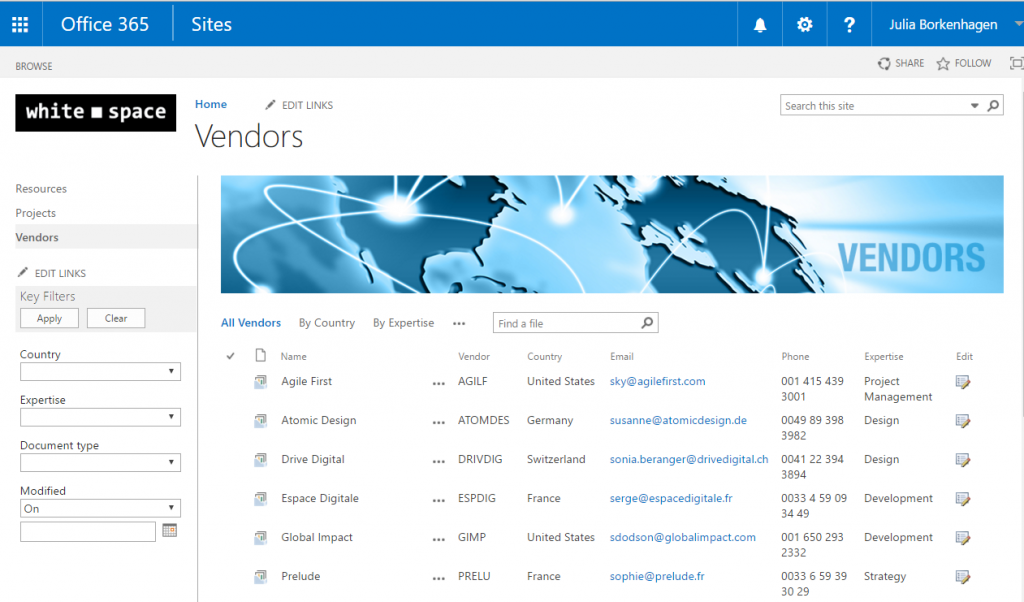
You don’t have to limit yourself to banners though. We also found that nicely designed process diagrams are helpful and engaging. And if a team has a feature presentation, video or a photo gallery, these are also good candidates to bring forward – but only if they are of good quality and informative as well.
5. Make document uploading easier than using the shared drive
Now that’s a tough one. The main challenge consists in getting users to abstain from using their beloved shared or (worse) local drive and instead put their files in SharePoint.
One solution will definitely fail: using the same folder structures as before. The result will be that users (if they care to use SharePoint) will soon discover the “Locate in Windows Explorer”, bookmark these folders to their desktop and never open SharePoint again. In my experience, folders in SharePoint are very weak indeed. The user experience is terrible. Instead of showing a tree structure, they display in breadcrumb mode, but with the breadcrumb not easily recognizable as such. Another major weak point is that while you can assign metadata to them, these don’t cascade down to the documents inside. Why, SharePoint, why?
It seems that Microsoft doesn’t invest in making folders usable because they see the future (rightfully, I might add) in tagging with metadata. So they give you the option to disable folders altogether, which is what we did with many libraries so not to confuse the users.
What SharePoint offers instead are Document Sets. These are like folders on steroids. When I say “offer”, it’s a bit exaggerated since they do a good job at hiding this highly useful functionality. In order to use Document Sets, you need to go to Advanced Settings, enable “Use Content Types”, then create a content type of “Document Set”, create a library view and assign it to this document set, customize it to specify which columns to display in the summary information and which metadata to cascade down to the documents … all nicely dispersed under library settings. Sheesh!
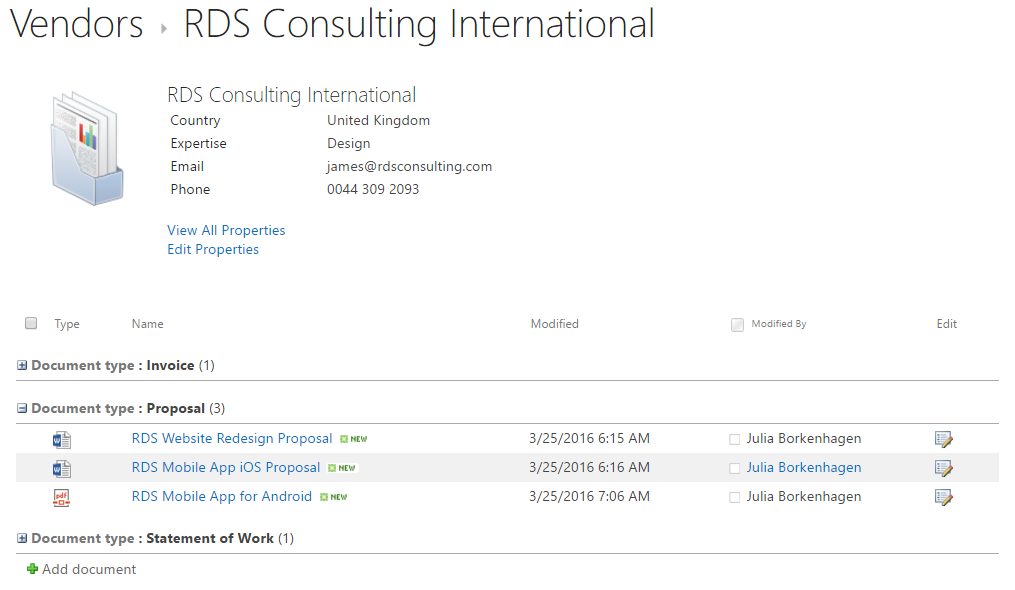
What makes Document Sets so wonderful though – once they have been set-up and configured – is that they can make the lives of the end users a lot easier. For very structured libraries (e.g. projects), these Document Sets can be initially created with all the metadata necessary – such as project owner, start and end date, functional area, product, etc. – and team members only have to drag and drop their documents into them. This is simpler than adding documents to a complex folder structure and makes it convenient to find them again, especially if you’re looking for documents produced by someone other than yourself!
For more info on Document Sets, check out this very useful article published on the ShareGate blog.
6. Create useful views and filters
Now, one of the great benefits from properly tagging your content is that you can create as many different views as you need. You can define the columns to display, group content, e.g. by region or year, have a default filter on a view, and much more.
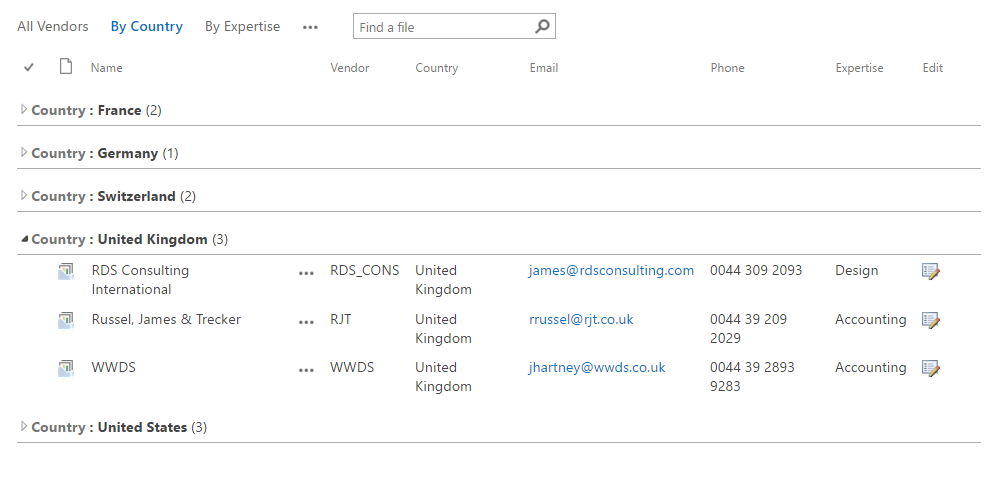
Before you get too excited, keep in mind that as soon you discover something great in SharePoint, there is almost always a “but”. Most notably for the “Grouped by” option – which kind of replaces the folders – you cannot group items by columns that have multiple values.
The view links display above the list, and by default three are visible. All additional views are hidden under “…”. Don’t get me started on the use of “…” in SharePoint 2013! I think it is a major usability mistake on the part of Microsoft, and only power users really get used to it. Similar to the famous “ribbon”, it is not intuitive or visible enough for regular business users to grasp.

Since editing metadata on lists and libraries can be non-intuitive for business users, we created a datasheet view called Edit Mode to easily allow mass updates of metadata. It features Excel-like functionalities such as drag-and-copy values and should help make “tagging” less tedious for end users.
Each SharePoint list or library comes with a search box that works really well. However, filtering is not intuitive at first glance. The column headers are very small and do not conspicuously indicate that you can actually sort and filter. In UX lingo, the affordance is low. Thankfully, you can add filters to the left-hand side below the navigation. You just need to know that in order to do so, you have to enable metadata navigation under “Manage site features”.
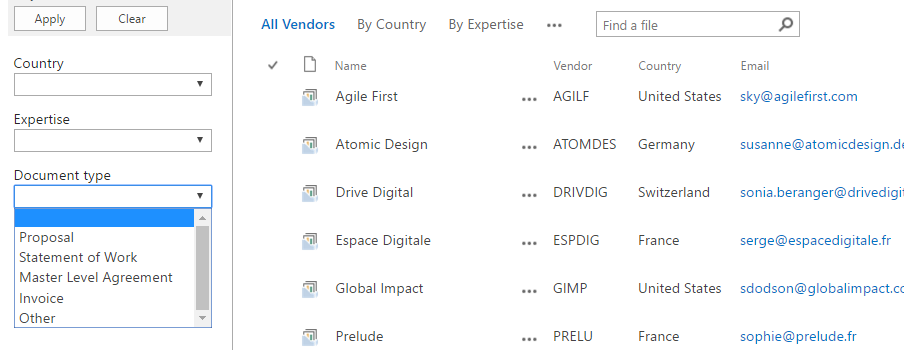
(By the way, “Manage site features” – found under “Site settings” – is a good link for site owners to remember if you’re wondering why you can’t find a particular feature or web part. Knowing which site features enable which web parts is another story entirely – if you’re not a SharePoint MVP then you’ll find yourself googling this from time to time.)
7. Find the killer app that will attract users and make the site owners shine
I remember in the old days, a typical “killer app” on an intranet was to customize your homepage by adding your own personal picture. Many moons have passed since then and expectations for “killer apps” have drastically increased. Ideally, it should be something useful and attractive at the same time.
In our case, we found that aggregating information from different areas and creating a central repository of information was the key to success. We created a resource tool that was needed, looked attractive, and didn’t “cost” the end users much. They simply have to tick a checkbox and a Nintex workflow publishes key documents to that central space, including of course our valuable metadata!
One natural candidate for the killer app would be some form of data visualization. It is a shame that SharePoint lists don’t offer these out of the box – inline colors, icons, indicators, simple graphs and charts. Simple stuff can be achieved using JavaScript. And you can always buy third-party plugins that satisfy just about any other wish you may have that SharePoint does not fulfill easily.
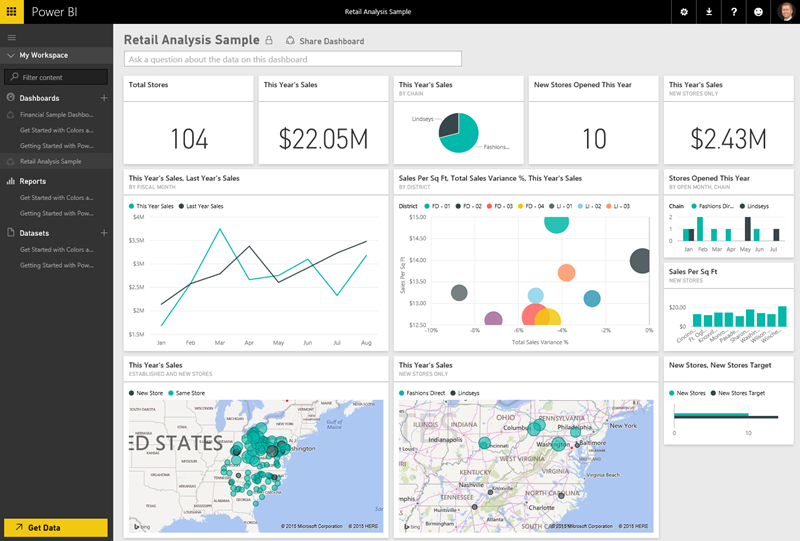
For the brave, there are data visualization capabilities such as PowerView that leverage Excel. And if you’re using SharePoint Online, I’d encourage you to take a look at the new Power BI offering from Microsoft – it’s a big step in the right direction.
8. Make sure the content is uploaded correctly
Initial content loading and careful migration are essential for a clean launch of the new site. Without this, business users will doubt the viability of the SharePoint implementation. As mentioned earlier, one question to ask is whether all documents or only certain types of documents should be moved from the network drives to SharePoint. And “moving” implies that while they should be available until the site goes live, they should be removed or archived afterwards. Otherwise, confusion may be even greater than before.
Before uploading can begin, content needs to be groomed and prepared. That’s often the most tedious task and can only be carried out by the content owners. What can help them is a new folder structure on the shared drive based on the new metadata, which in turn will help the migration tool or content loader to tag the documents. An Excel sheet can provide additional metadata that need to be added. This pre-load clean-up is critical, since one of the benefits of a new central location will be to have up-to-date, quality data without the risk of duplications, drafts and random items. As we all know: “garbage in – garbage out”.
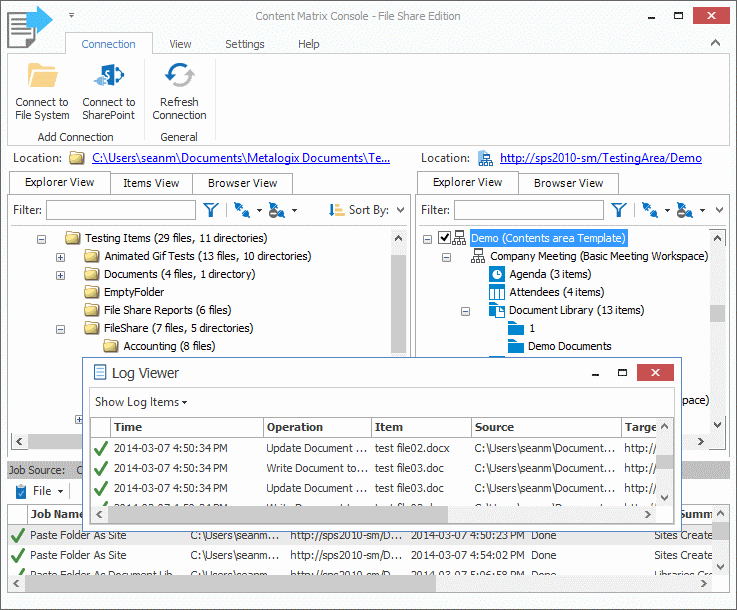
The upload itself can be done using custom PowerShell scripts, migration tools such as Metalogix and ShareGate, or the content owners can migrate their documents manually. If done manually, it is worth noting that the “last modified” date will be set to the current date and the “modified by” field will be the name of the uploader. In other words, the original document owner information is lost. So if the volume of documents is significant and creation and modification dates are important, using a migration tool is a must.
9. Training, training, training
Modern digital tools should not require much training, but this being SharePoint, end user training is absolutely vital. As you wean users onto SharePoint, carefully evaluate how much information is needed at any given stage in the learning process, because too much information too early is likely to be overwhelming. A few short training sessions are better than a full day, and a quick “cheat sheet” definitely helps.
10. Seek out UX consultants and business analysts who know SharePoint and enterprise software
OK, so this is a shameless plug for UX consultants like myself, but it’s really important not to overlook this part.
With a user-centered approach, IT understands better what the business wants to do, and the business has a clearer picture of what IT intends to deliver. Success with SharePoint is not only a matter of finding qualified SharePoint experts to do your technical implementation but also about getting to the heart of business processes and user needs and then adapting the technology to fit those requirements. That’s where UX can make a difference.

SharePoint team sites can seem simple on the surface – people want to share stuff and work together on projects – but the reality is that they require a lot of planning, collaborating, and finding creative solutions in a limited environment.
We all are creatures of habit, and making the mind shift from a hierarchical folder structure to a flat, metadata-driven world of views and filters is not an easy one. Bringing in UX expertise can smooth out this transition and also help mediate between the different team members, enabling them to craft a common vision of how to organize their work and get the most out of their intranet.
(This article originally appeared on Medium.)


